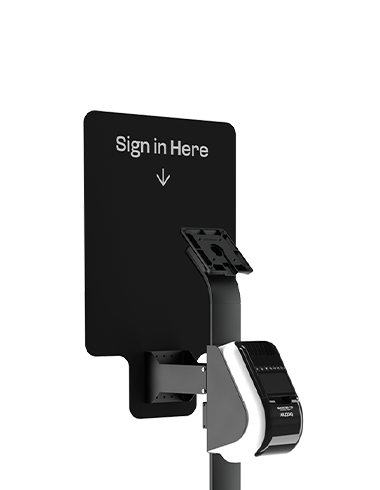
Same-Day Dispatch for Orders Placed by 2 pm.

Resources Support
Cart is empty
Cart totals
Subtotal:
$0.00
Total:
$0.00
Popular Search

Overview

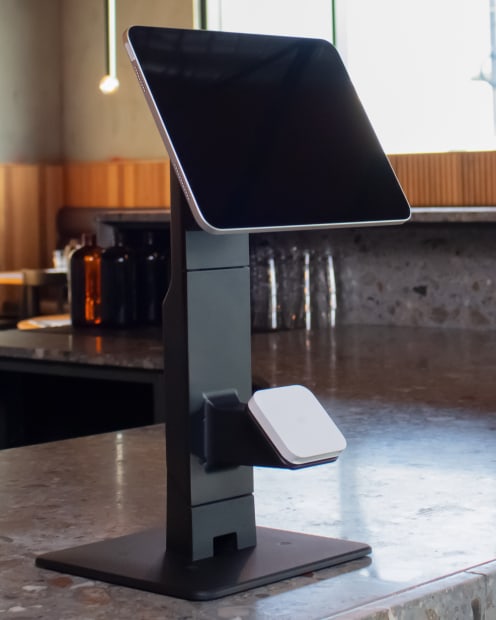
The Evo Floor Stand Accessories Bundle elevates your display capabilities with a range of brackets tailored for various applications. From securely mounting VESA-compatible devices to supporting essential accessories like payment terminals and signage, this bundle streamlines operations and enhances productivity across retail, educational, and commercial environments. Upgrade your business with this all-in-one solution!
Download fact sheet
Supported Monitors
Supported Monitors
100x100mm VESA-compatible monitors

Measuring
Measuring
Height: 4.74 feet (114 cm)
Width: 11.81” (30 cm)
Weight
Weight
12.8-15.7 lb (5.8-7.1 kg)
Materials
Materials
Die-cast aluminum with powder coating

Setup Guide

Brother Printer Bracket
Payment Device Bracket
Sign Holder Bracket
01 Gather parts and device
Locate the parts along with your tablet device and charging cable and continue to Step 1.
02 Feed cable through hinge pole
Feed tablet charging cable down through the Hinge Pole. Ensure enough length is fed through to easily plug into your tablet.
03 Remove connector
If you need to run an additional cable to power your accessory(ies), remove x3 screws from the Connector on the Base Pole, and slide out the Connector.
04 Feed cable through poles
Feed accessory cable(s) up through the Base Pole, then up the Hinge Pole, and finally out through the cable cutout.
05 Reattach connector and feed cable
Reattach the connector and screw back in x3 screws. Feed the tablet charging cable down through the Base Pole.
06 Attach hinge pole to base pole
Slide the Hinge Pole onto the Base Pole. Screw in Grub Screws with Allen Key to secure.
07 Screw on baseplate
Run the charging cable(s) through the Baseplate, then screw on the Baseplate Screws from underneath.
08 Attach VESA mount to hinge
Locate the VESA Mount and attach to the hinge by screwing in the x4 Countersunk Screws to secure.
09 Attach device to VESA mount
Attach your VESA compatible device by screwing in from the rear
10 Follow correct device instructions for screw usage
We have supplied x4 Pan Head Screws to assist with mounting your VESA compatible device. Ensure to follow instructions on your device to use the correct screws.
11 Attach clamps to pole
Insert Socket Head Screws into the bottom 2 holes of each clamp to attach them to the pole. Leave loose for adjustments.
12 Attach printer bracket to pole
Use Countersunk Screws in the top 2 holes of each Clamp to attach the Brother Printer Bracket to the Evo Pole.
13 Attach printer to bracket
Partially insert the x2 Pan Head Screws into the Brother Printer, leaving a gap between the Printer and the screw head. Hook these in using the Keyhole Slot on the Brother Printer Bracket.
14 Secure printer to bracket and connect cable
Attach the Brother Printer to the Bracket by aligning the screws with the Keyhole Slot and placing it in position. Then tighten the x2 Pan Head Screws to secure it and plug in the charging cable.
01 Gather parts and device
Locate the parts along with your tablet device and charging cable and continue to Step 1.
02 Feed cable through hinge pole
Feed tablet charging cable down through the Hinge Pole. Ensure enough length is fed through to easily plug into your tablet.
03 Remove connector
If you need to run an additional cable to power your accessory(ies), remove x3 screws from the Connector on the Base Pole, and slide out the Connector.
04 Feed cable through poles
Feed accessory cable(s) up through the Base Pole, then up the Hinge Pole, and finally out through the cable cutout.
05 Reattach connector and feed cable
Reattach the connector and screw back in x3 screws. Feed the tablet charging cable down through the Base Pole.
06 Attach hinge pole to base pole
Slide the Hinge Pole onto the Base Pole. Screw in Grub Screws with Allen Key to secure.
07 Screw on baseplate
Run the charging cable(s) through the Baseplate, then screw on the Baseplate Screws from underneath.
08 Attach VESA mount to hinge
Locate the VESA Mount and attach to the hinge by screwing in the x4 Countersunk Screws to secure.
09 Attach device to VESA mount
Attach your VESA compatible device by screwing in from the rear
10 Follow correct device instructions for screw usage
We have supplied x4 Pan Head Screws to assist with mounting your VESA compatible device. Ensure to follow instructions on your device to use the correct screws.
11 Attach clamps to pole
Attach the Clamp to the pole using x4 Socket Head Screws.
12 Attach payment device bracket to stand
Attach the Payment Device Bracket to the stand using x4 Pan Head Screws.
13 Cut adhesive to size
If required, cut supplied Adhesive to required size.
14 Attach payment device and connect cable
Attach your payment device to the bracket using the Adhesive and plug in charging cable.
01 Gather parts and device
Locate the parts along with your tablet device and charging cable and continue to Step 1.
02 Feed cable through hinge pole
Feed tablet charging cable down through the Hinge Pole. Ensure enough length is fed through to easily plug into your tablet.
03 Remove connector
If you need to run an additional cable to power your accessory(ies), remove x3 screws from the Connector on the Base Pole, and slide out the Connector.
04 Feed cable through poles
Feed accessory cable(s) up through the Base Pole, then up the Hinge Pole, and finally out through the cable cutout.
05 Reattach connector and feed cable
Reattach the connector and screw back in x3 screws. Feed the tablet charging cable down through the Base Pole.
06 Attach hinge pole to base pole
Slide the Hinge Pole onto the Base Pole. Screw in Grub Screws with Allen Key to secure.
07 Screw on baseplate
Run the charging cable(s) through the Baseplate, then screw on the Baseplate Screws from underneath.
08 Attach VESA mount to hinge
Locate the VESA Mount and attach to the hinge by screwing in the x4 Countersunk Screws to secure.
09 Attach device to VESA mount
Attach your VESA compatible device by screwing in from the rear
10 Follow correct device instructions for screw usage
We have supplied x4 Pan Head Screws to assist with mounting your VESA compatible device. Ensure to follow instructions on your device to use the correct screws.
11 Attach clamps to pole
Attach the Clamp to the pole using x4 Socket Head Screws
12 Attach sign holder bracket to stand
Attach the Sign Holder Bracket to the stand using x4 Pan Head Screws.
13 Attach sign to bracket
Attach your sign to the Bracket using x4 Phillips Head Screws and x4 Nuts.
Problems during setup?

Shop at Bosstab

Excellent
5 Stars
4.81 based on 573 reviews
REVIEWS.io
box tick 1
Fast Delivery

Same day dispatch when you order before 2:00 pm.

verify 1
Bosstab warranty

We back our product with a massive 24 month warranty.

happyemoji 1
Reliable Support

Got a question? Chat, email or talk to our super friendly support team.

+ -
Share Your Cart